Track Editor
|
|
The track editor shows the settings options for the selected track. It can be shown and hidden with this icon above the track header. |

The Track Editor gives you quick access to all the important parameters of the active track. By default, it is located at the left edge of the project window, but like any other Sequoia window, it can be docked as desired .
In the Track Editor, settings of a single track are clearly displayed in individually expandable sections. This allows you to edit all relevant settings of the selected track in the Project window even without an open mixer or with low track heights. The controls correspond to those in a mixer channel, so you can also think of the Track Editor as a single mixer channel for the active track.
You can also open the Track Editor via the corresponding button of the bottom toolbar or via the menu View > Track Editor (keyboard shortcut: Ctrl + Alt + Shift + E).
When docking in landscape mode, a different layout is used, the controls are identical.
Main
The section Main contains the most important settings for any tracks.
|
|
|
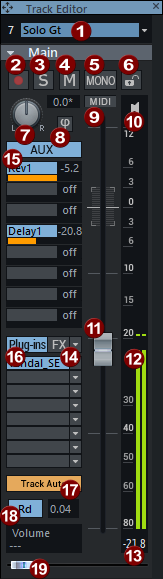
Track number display and track name: Right-clicking on the track name opens the "Track Options" dialog. |
|
|
Record symbol: Activates the track for recording. |
|
|
|
S: mutes all other tracks. |
|
|
|
M: Mutes this track. (Mute) |
|
|
|
Mono: sets the track from the input to the pan control to mono processing, i.e. all track effects before the pan control calculate in mono. However, the Submix and AUX return buses always remain stereo. In the default routing, only the post-VST plug-ins and the post-AUX sends are located after the pan control and are thus calculated in stereo. The routing position of the pan knob can be set in the FX Routing dialog.
|
|
|
|
Lock: Prevents the objects in the track from being accidentally moved or deleted. |
|
|
|
Panorama: Controls the positioning in the mix. |


|
|
Phase reverse: Rotates the phase of the signal by 180 degrees. |
|
|
MIDI: sets the track to MIDI recording. |
|
|
The speaker icon turns on the Monitoring, i.e. the playback of incoming signals when the track recording button is activated. "MIDI thru" will be set active here for MIDI tracks. |
|
|
Volume fader |
|
|
Level meter: The two LED chains show the output signal of the track, and the input signal when monitoring is activated. |
|
|
Volume input field |
|
|
FX: opens the Effect Routing dialog. Right-clicking on this button gives you access to the menu for the track effect chains. If you select the Mixer option in the menu, the mixer will be opened at the track's position. |
|
|
AUX: Here you can set the AUX sends |
|
|
Plug-ins: Here you can reach the track insert effects. Clicking on the empty insert slot opens the plug-in browser, where you can load a plug-in to the slot. Click on an occupied slot to activate/deactivate the plug-in. Right-clicking on the slot opens the plug-in's interface. In the menu at the insert slot |
|
|
Use the button Track
|
|
|
Automation mode: Left-click to quickly switch the automation mode between Right-click to access all automation modes. |
|
|
An automatable parameter can be controlled directly in the track editor with the automation controller. Click on the parameter field above the slider to display the automation menu and select the effect and parameter. |


 you reach further functions, e.g. you can open the plug-in browser again to exchange or remove the plug-in. The


MIDI
The section MIDI contains the specific settings for MIDI tracks.
|
|
|
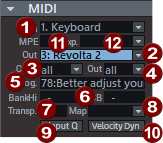
In : MIDI input menu |
|
|
Out: MIDI output menu In addition to the hardware MIDI outputs, the menu also gives you quick access to all Boris FX software instruments and lets you send the track's MIDI output to a VST effect. |
|
|
Channel In: MIDI input channel |
|
|
Channel Out: MIDI output channel |
|
|
Program: With Program you can select the presets of the software instrument selected at Out. If a MIDI hardware output is set, the default GM program names are displayed. The program change commands are sent at each playback start. |
|
|
Bank MSB/LSB: Additionally device specific bank change messages can be sent to control an external MIDI instrument. |
|
|
Map: Here you can select a Drum Map for the assignment of the MIDI notes to device-specific sounds. |
|
|
Transpose: Here you can transpose the MIDI output. This function works in real time, i.e. the MIDI data in the MIDI objects is not changed. If a drum map is selected, the transpose function will not be available because the pitch is fixed by the drum map. |
|
|
Velocity Dyn: This button activates the Velocity Dynamics as a real-time track effect. |
|
|
Input Q: Input quantization. Incoming data is then already quantized during recording according to the MIDI quantization settings. You can restore the original positions with the menu command Object > Quantize > Reset Quantization. |
|
|
MPE: Sets MIDI recording to MPE mode |
|
|
Note Expression Map: Here you can select a VST3 Note Expression Map. |
Audio/EQ/Comments
|
|
|
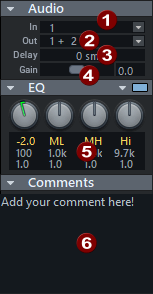
In: This sets the input of the track, which can be the audio input devices |
|
|
The Out slot determines the audio output device. This can be, for example, a hardware output, the master or a bus. |
|
|
|
Delay: This sets a delay time for the track. |
|
|
|
Gain: This controls the amplification level of the input signal in dB. |
|
|
|
EQ: The parametric EQ for the track. Right-click to access the advanced settings dialog with six frequency bands. |
|
|
|
Comments: The Comments area corresponds to the track comment in the Infomanager. |